Hello Friends!
I’ve been using Adobe Lightroom for over a year now and am so happy I didn’t wait to make this purchase. This program will massively improve the lighting and quality of your photos and if you blog or have a furniture painting business like me well-lit, clear photos are essential for selling pieces and growing your blog and business. Purchasing and investing time in learning the best features to use in Lightroom can make a huge and positive influence on unlocking all the potential for your business.
I think it’s important to recognize we all start somewhere. There’s no doubt I have taken terrible photos and even have blog posts to prove it. But that doesn’t mean you can’t improve and get away from dark, shadow-y photos with lot so noise (noise= graininess). Since I began using a DSLR camera (you can read about the camera equipment I use here) and editing with Lightroom the pictures of my pieces have improved so much. I recognize it and others do as well. Who doesn’t love a well-lit, well-staged, and well-photographed picture of some pretty furniture or room? I know I do!
I’ve written about all of the adjustments and tools I use within Lightroom and I also took screen shots and added text with arrows to help further explain and serve as a visual tool. If you want to view any image in a larger size just click on the image. Tt will pop up and be easier to view and read. Let me know if you have any problems or questions.
____________________________________________________________________
I purchased Lightroom 5 in January of 2014 after trying the 30 day free trial. It’s at least worth the 30 day free trial to see how you like it, what features you can use, and how much it can change your photos. Purchasing Lightroom is definitely an investment. I paid $110 for the whole program which was the student price (I guess paying that college tuition came in handy!), but you can also get Adobe Lightroom and Photoshop for $9.99 a month. Since I don’t currently use or need photoshop (I at least don’t need photoshop often) I chose to pay the full price instead of the monthly fee. Obviously that was the best decision for me, as 15 months later I would have paid $150 so far. I will point out that if you pay the monthly fee, when a new version of Lightroom comes out you don’t have to pay for the new program. If you already own an older version of the program (like I do) there is an upgrade fee that is cheaper than full price. But, it’s not always necessary to upgrade right away and by the time a new version comes out I know that I will still have saved money by buying the program outright rather than paying the monthly fee.
**If you are also a Student (or a Teacher) you can buy Adobe Lightroom 5 now for about $80, make sure to look for the discounted pricing**
Here’s a comparison of a photo of the Reverse Dipped Dresser before editing and after editing. I used some arrows and circled some of the spots that were edited. I cropped the photo to get rid of most of the ceiling and crown molding but some of it still was in the photo. Next I used the Spot Removal tool to get rid of the molding (or disguise it the best I could, the water mark covered that area anyway) and also removed marks on the wall and the top to the lamp. I also did basic editing like raising the exposure, etc. So let’s get into details of the adjustments I made and how to make those adjustments in Adobe Lightroom 5.
Here are the key features I use in Lightroom (while in ‘Develop’ Mode).
The “Basic” features I use
1. The auto white balance tool. Click on the tool, then click somewhere on your photo that is supposed to be white. I usually use it on the wall (which is grey, not white), but it does a good job at adjusting the white balance to make it appear as it is in real life. Sometimes it changes too much and I go and manually adjust the Temperature and Tint, but for the most part it works or is a good starting point. If your photos are too warm (yellow) or too cool (blue) this tool allows you to adjust and white balance the whole photo.
2. Exposure. I turn the exposure up for most photos. It brightens up the photo and makes it seem like there was more natural light than what came out in the photo. If you shoot in manual mode and control the shutter speed, aperture, and ISO you shouldn’t have to change the exposure too much, but I often times find it better to shoot the photos a littler dark than I like and edit the exposure once I add the photos to Lightroom. *Also note I bought a new camera recently and learned more about shooting in manual mode so I now spend less time and use less adjustments when editing photos*
3. Highlights, Shadows, Whites, and Blacks. I don’t change these much, but sometimes I turn the shadows down a bit if there are harsh shadows in the photo. I do adjust Whites and Blacks as well. Here’s a trick, hold down the alt/option key + command key (this is for mac’s) then move the sliders. You will see the photo disappear (turn black or white) as you adjust the Whites or Blacks slider and when you start to see the little white or black dots appearing that’s when you have adjusted it enough.
4. Changing a photo to Black and White. You just need to make one click to change a color photo to black and white. At the top of the right side bar menu under the “Basic” heading you will see “Black & White”. The “Color” should be selected already so just click “Black & White” and your photo is changed. To change it back just select “Color”.
The “HSL/Color/B&W” Features
The next features I use only when they are needed. You can find them under the HSL/Color/B&W heading
1. Hue – Saturation – Luminance: There are times when a certain color appears slightly different in photos than it does in person. I try to represent the paint colors on furniture as accurately as possible, so if the color is off I use the Hue, Saturation, and/or the Luminance tool to try and fix the color a bit. Sometimes there’s too much green/yellow undertones showing up on a piece that is painted blue so I can use the Hue tool to adjust that. If I use any of these tools I start with the Saturation tool for the specific color. You use the slider for the color you need to adjust.
If you have a photo where you want to raise or lower the overall saturation you can do that to the whole photo all at once using the Saturation slider adjustment found in under the “Basic” category of the sidebar menu.
I don’t scroll down past that section in the sidebar menu of tools. Those are the main features I use for editing and enhance the photos I take of pieces for my furniture business.
Creating Presets
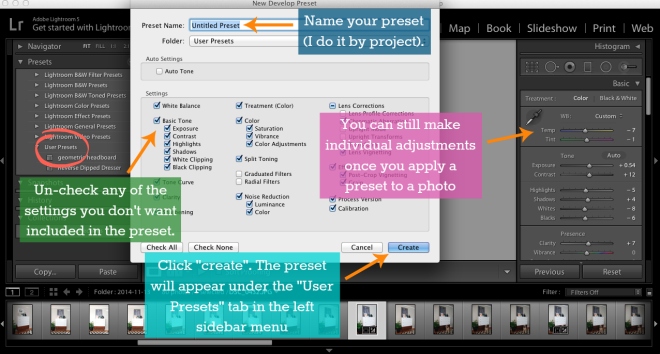
Once you have made all of the the adjustments I have mentioned this far you can create a Preset for the set of photos you are working on. If most or all of the photos were taken at the same time with the same settings on your camera you can create a preset and quickly make the same adjustment you did to the first photo you edited. It will save you time when editing multiple photos.
To create a preset click the plus button (+) next to the “Presets” heading in the sidebar menu on the left side of the screen (seen in the photos from the HSL/Color/B&W section above, it’s in dark blue). When you click the + button a window pops up as seen in the photo above. Name your preset (I do it based on the project) and then look through and check or un-check any of the boxes of adjustments you want to be included in the preset. If you have already done any cropping, straightening or spot removal (I’ll get to those in a minute) these will not be included in the preset as they are specific to each photo. Once you have checked what you wanted click “Create”. The preset will show up in the “User Presets” folder in the left menu bar (circled in the photo above). You can change where the present goes by changing the folder in the “New Development Preset” window. Now, select a different photo and then click on the preset you just created. All of the adjustments are applied to that photo. You can still manually adjust anything like exposure, white balance, contrast, etc. and it is only applied to the photo you have selected to edit.
Cropping and Straightening
I use the Crop Tool (or as Lightroom calls it the Crop Overlay tool) which you can find at the top, far left in the tool sidebar (shown in turquoise in the photo above). You can crop your image using this tool. Un-click the lock button if you want to customize the size and shape of how you crop your photo. You can also straighten your photo when using the crop tool.
Spot Removal
One other tool I use quite often is the Spot Removal Tool. I didn’t find out about this tool for a few months, but I randomly stubbled upon it while fiddling in Lightroom and now use it on most of my photos. There is usually a large, heavy mirror hanging on the wall where I stage photos and 3 large nails that are usually covered and holding up the mirror. Well, those are rarely ever covered by what I have hanging on the wall above pieces so I remove those dark spots with the Spot Removal Tool. This tool is found next to the crop tool. It looks like a circle with a little arrow coming out of the right side of it. Once you click on the tool you can adjust the size of your brush. I keep it the smallest it can be while still covering the little nail spots on the wall. I keep the opacity to 100 and the feathering to 0. Then, I just click on the little nail spots and they disappear. The tool finds another spot that it copies and puts over the spot you removed. Just so you know, you can click and drag the spot it is cloning to find a better match if the one it automatically chooses does not work perfectly. If you don’t want harsh edges you can adjust that by increasing the feathering slider.
Adding a Watermark to photos and Exporting
Adding watermarks is an easy, time-saving tool in Lightroom. I transitioned from using Aperture (editing program) to Adobe Lightroom and in Aperture I had to manually create a watermark for each photo. Write the text, change the font, color, size, position, etc. I tried to keep them all identical, but that was nearly impossible and insanely time consuming. With Lightroom you can make a preset for you watermark and then add it to the photo when you export it (save the photo). By combining it into one step it saves so much time! You can save even more time if you watermark and export photos is batches.
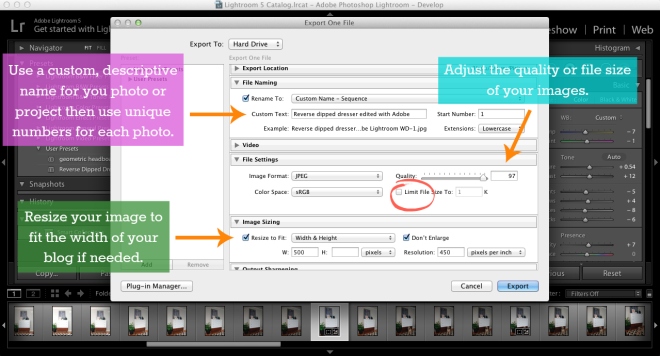
To create a custom preset watermark you will want to start like you are exporting a photos. Go to File, then Export. A new Export window appears where you can change the name of the photo file, the Export location/where it is saved to, the image size, and watermark. I recommend giving your file a specific name that relates to the project it is for and then use a unique number for each photo within that project. I also add a “WD” to the end of any photo I export that has a watermark (the WD stands for The Weathered Door if you didn’t get that). That way when I am looking through the pictures on my computer I know if the photo has been watermarked or not. Under “File Settings” you can change the quality or size of the photo. If you keep scrolling down the second to last option is “Watermarking”. To create a new watermark click the drop down menu and select “edit watermarks”.
Logo or Graphic Watermark
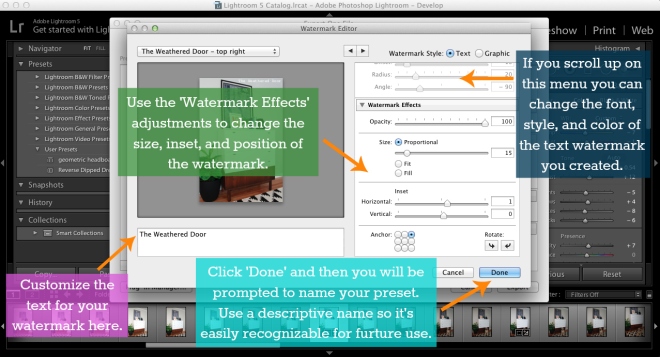
The Watermark Editor window opens and now you can customize your watermark. In the top right you can select if you want a text or graphic watermark. I use a text watermark, but I do sometimes upload my logo (seen in the header at the top of my blog). If you want to use a logo or graphic select “graphic” and then right below that under “Image Options” click “Choose…” and upload the file. The graphic will appear on the photo preview in the left side of the window. You can then adjust the size, opacity, and position using the adjustment sliders. Once you have the watermark how you want it click “Save” and you will be prompted to title your preset.
Text Watermark
For my photos that I use on social media and my blog I use a Text Watermark with my business and blog name, The Weathered Door. Just like creating a graphic watermark you do the same first steps but instead of selecting “graphic” you select “text”. You can change the text in the box below the preview image on the left side of the window then change the font, style, color and so on in the menu on the right. You can also change the opacity, size, inset and placement. Then click “Save” and title your preset. Once you have created the preset you can select it using the drop down menu in the main Export window. I have 4 ‘The Weathered Door’ watermark presets that I use for watermarking images. I have one for each corner or a photo and I have titled them accordingly so it is easy to select which watermark I want based on placement of items in each photo.
If you want to view how the watermark will look before exporting the image just pretend like you are making a new watermark and select “Edit Watermarks…” from the drop down menu. The Watermark Editor Window will pop up and you can see in the preview photo what the watermark will look like. If you are exporting multiple photos at once use the arrows at the top middle of the window to click through and preview each photo. Just click cancel to exit when you are done. If you want to delete watermarks you also click “Edit Watermarks…” from the drop down menu and when the Watermark Editor Window appears you use the drop down menu in the top left to delete watermarks. First select the watermark you want to delete then click the delete option. If there is ever a time you are exporting personal photos that aren’t for you blog or business but have been edited in Lightroom you can just un-check the “Watermark” box and no watermark will be added to your photos.
Previous and Reset Buttons
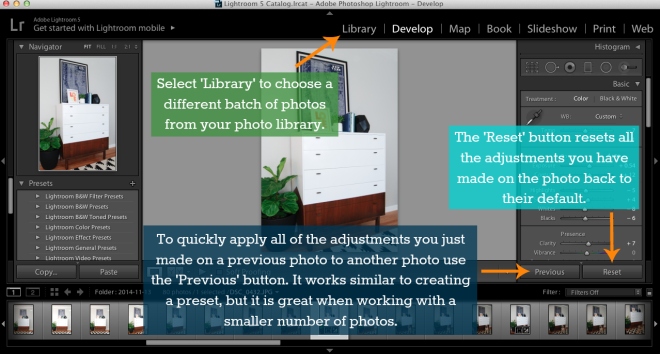
The last thing I want to touch on are 2 little buttons you may find helpful. I don’t use them often, but when I need to use them it’s nice to have them handy. Similar to the Presets I talked about earlier (the presets that apply all of the adjustments you have made to other photos) you can also use the “Previous” button found on the right hand side below the side bar menu. If you edited a photo and then select another photo that is similar you can click “previous” and the adjustments you made on the previous photo are applied to the new one you selected. This is great if you are only editing a few photos and don’t want to create a preset.
The button right next to it labeled “Reset” does exactly what it sounds like. It resets all of the adjustments you have made to that photo. It takes it back to how the photos was originally shot. It’s as easy as that!
__________________________________________________________________
If you are new to Lightroom or have never used it before this may seem like a lot of information to be thrown at you all at once. It’s best to start out small. When I first began using Lightroom I only changed the exposure, contrast, and shadows. Overtime I became more aware and better at using some of the other tools and features Lightroom 5 has to offer. I found it easiest to start with just a few adjustments and get used to those before learning about more. Just start section by section. Bookmark or pin this post to reference later. As always, let me know if you have questions or if you have any features to share with me! I tried to keep the post focused on the most-used or most helpful features I utilize and know about in Lightroom, but I guarantee there is a lot more for me to learn about. 🙂
Thanks for stopping by!
-Reeves







Thanks for the tutorial!! I pinned it for later. I'm using pic-monkey right now but I know I should use something more professional.
Thanks again,
Denise
Ditto to the above comment!
I'm in WA as well, so I feel your pain for needing more light! Can't you achieve the same look with just increasing the brightness of a photo? That's typically what I do. I've been using Paint.net forever…it's FREE! #iamsupercheap
P.S. I simultaneously love and hate you! Everything you do is FANTASTIC! 🙂
Increasing the brightness/exposure is one of the main adjustments I make, but as you can see from the post I use Lightroom for a lot more than that. I adjust colors that aren't being accurate represented, remove spots, marks, etc. from the photo,s and use the program to watermark my images. I used to use Aperture which I got for free when I first purchased my laptop, but it was very limiting and Lightroom has proven to be a lot more user friendly with my more features for me to use. Time is money and I spend so much less time editing photos with Lightroom than I previously did (especially when adding watermarks).
Thanks, Denise! It really is worth buying Lightroom. Be sure to check out the free trial. It might convince you to make the leap! 🙂
Great tutorial! I am currently using the Free trial and I am loving Lightroom, I will be buying it…. I really love how easy it is to edit a group of photos at one time, saves a lot of time! Thanks for sharing!
I am currently learning how to use photoshop & it's a lot to learn! Thank you so much for your tutorial. I've been looking for a good explanation on the simple features of it & this will help me so very much.
Also, your work is beautiful & your blog is so well done.
Thank you Thank you Thank you